Several months ago, I began using EarthLink DSL (Digital Subscriber Line) high-speed access to the Internet; since PPPoE (Point-to-Point Protocol over Ethernet) software is required in order to talk to the DSL modem, a fairly modern computer is required to run the software (EarthLink requires a PowerPC with Mac OS 8 or above). Well, why should the young computers have all the fun? This webpage describes how I have been able to set up my network so that any of my Macs, including the SE with dual 800 kB floppies and no hard drive (but with Ethernet!), can connect to the Internet via DSL, without having to use another Mac (or *shudder* a PC) to handle the PPPoE! This is possible because of the capabilities built into the Linksys Cable/DSL Router I just bought, coupled with a little low-end software.
This webpage serves the specific purpose of telling how one can allow the lowest of Low End Macs to use DSL; a Macworld article from December 2000 tells how to connect most Macs. Specifically, while EarthLink (and probably other ISPs) requires you to use a Power Mac to drive the DSL modem directly, if you hand the PPPoE chores off to a router then you only need enough Mac to run Netscape 4 or Internet Explorer 4 (in particular, any Mac that can run System 7.6.1 is able to handle Netscape 4.0.8), which will allow you to configure the router via the browser. Then if you follow the instructions in the Macworld article linked above, you will be able to connect any Mac that can use Open Transport TCP/IP instead of MacTCP to the router, and thence to DSL. The reason I put together this webpage is that for the oldest Macs and System Software versions, you need to make one small additional change to the default configuration of the router in order to let them talk to it; this isn't a "hack" or even much of a trick, but I couldn't find it spelled out anywhere (and despite the fact that the EtherFast 4-Port Cable/DSL Router I bought was a finalist for a Macworld Eddy award in 2001, Linksys doesn't provide any formal Mac tech support!). So I'll detail the procedure here; those who have already set up the router using the instructions in the Macworld article linked above can pick up the changes at the appropriate point below.
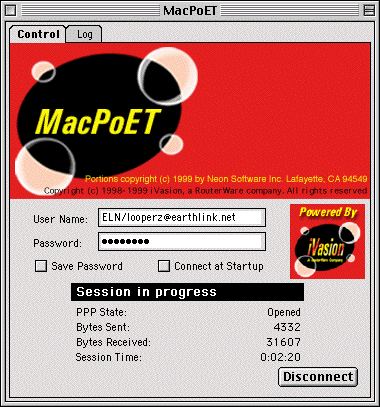
Let's get going! As I noted, I already had a working DSL connection, with my FrankenCurve (a Power Computing PowerCurve Mac-clone upgraded with a Sonnet 500 MHz G3 card and running Mac OS 9.1) running the MacPoET PPPoE application pictured above. The DSL "modem" (not technically the correct term, since a modem MOdulates and DE-Modulates an analog phone signal, whereas the "D" in "DSL" stands for "digital"...) connects to the phone line at one port and to the computer via a crossover Ethernet cable at its other port. I then have to use the MacPoET application to make the connection (though, as you can see from the checkboxes, this can be automated). You may have something different, if you have a newer EarthLink installation or a different ISP, but you will have some kind of application.
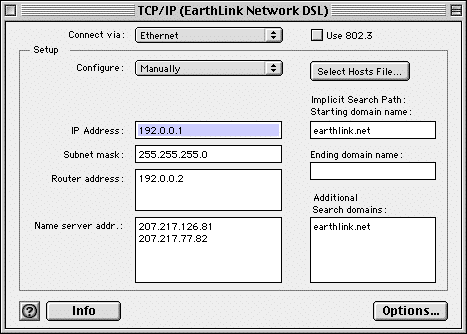
The above screenshot shows the "EarthLink Network DSL" configuration that is created for the TCP/IP control panel by the installation software. We will be changing this; you need to write down the name server addresses in the lower left box and the search domains on the right side, for reuse later. (I will be creating new named Configurations for the TCP/IP control panel; you can do so from the "File" menu if you like, or just make changes directly in whatever configuration comes up when you open the control panel.)
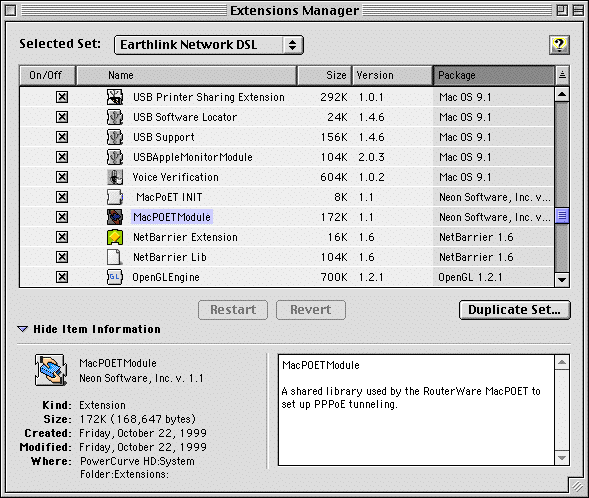
The EarthLink DSL installation software also installs a couple of extensions to support MacPoET, as shown above in the screenshot of the Extensions Manager control panel. I didn't see it anywhere in the instructions (Macworld or Linksys!) that I've read, but since your Mac won't be handling PPPoE any more you can disable these extensions, or any similar ones that your ISP's DSL package installed. Then shut down the Mac and plug in the router: the Ethernet crossover cable that formerly connected your DSL modem to the Mac now connects it to the router's WAN ("Wide-Area Network," i.e., the Internet) port, and a straight-through Ethernet cable connects your Mac to the router's LAN ("Local Area Network") port, or to one of them if (like mine) it has multiple ports. Then reboot the Mac and open the TCP/IP control panel.
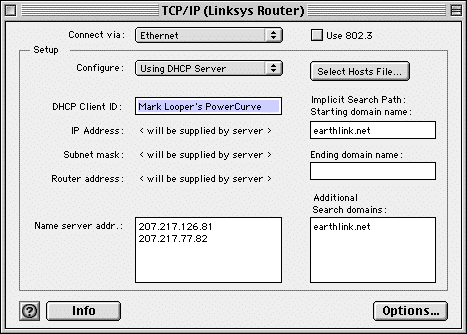
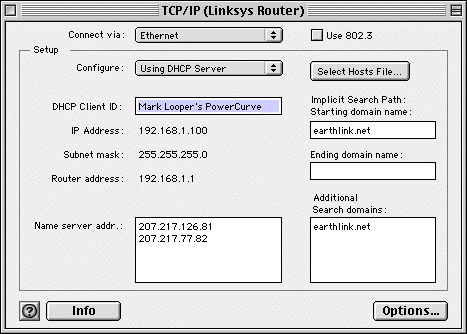
This TCP/IP screenshot looks a little different from the one in the Macworld article linked above; if you choose to "Configure: Using DHCP Server," then the IP ("Internet Protocol") information will be supplied to your Mac by the router. The Macworld article's screenshot showed the name server addresses to be among the information supplied by the router; that is, the address or "< will be supplied by server >" notation is not in an editable text box there, while the name server addresses and search domains shown here are editable. I am not expert enough to know what causes your TCP/IP control panel to decide what to do, but if you have editable text boxes as shown here, then this is the time to enter the information you wrote down from the previous configuration.
DHCP is "Dynamic Host Configuration Protocol," a means of assigning IP addresses to computers on a network (in this case, the LAN on "this side" of the router) as they are needed, rather than having to write everything down and keep it straight manually to avoid conflicts. This is where the oldest of Macs get thrown off the train; if your Mac and/or its system software are too old to handle the recent Open Transport networking software (which includes the TCP/IP control panel shown above), then it cannot talk to a DHCP server (the agent that assigns the IP addresses) like the one that is, by default, enabled in the router. But for the moment, your newer Mac should now be able to communicate with the router; for the Linksys model I bought, you simply start up a web browser and type "http://192.168.1.1/" in the Location box. Then, following the instructions provided with your router, you use the browser to transfer information like your ISP username and password, and any fixed IP addresses provided by your ISP, into the router. Again, I'll leave it to the Macworld article to walk you through this. At this point I found it necessary to shut everything down and power it back up, first the router and then the DSL modem and computer; you'll want to test your DSL connection with the newly configured router, and when something refused to talk to something else I found that cycling power cleared it up.
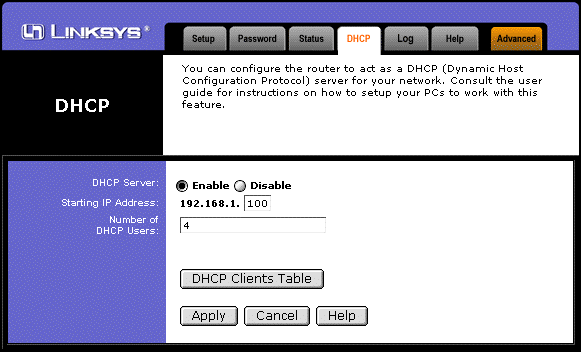
This is a "clip" from the router's configuration screen that comes up when you type "http://192.168.1.1/" into your browser. The DHCP tab lets you start up and shut down the DHCP server; here is how I had it set up initially. The server gives addresses starting with 192.168.1.100 (the default) to computers on the LAN, as they need them; I bought the 4-port router, so I told the server to be ready to handle up to four DHCP users.
Once you have successfully connected to the Internet through the router, the non-editable fields in the TCP/IP control panel (which displayed "< will be supplied by server >" when you first told the control panel to "Configure: Using DHCP Server" above) now have been given definite values by the router. Write these numbers down, because here's where we depart from the default installation in order to let our faithful old Macs come aboard the DSL bandwagon too!

Before changing the TCP/IP control panel, go back to the DHCP tab in the router setup page in your browser, and click the radio button to Disable its DHCP server, then click the "Apply" button. It now becomes your responsibility, not the router's, to assign non-conflicting IP addresses to the computers on your LAN; but you can handle it, right?
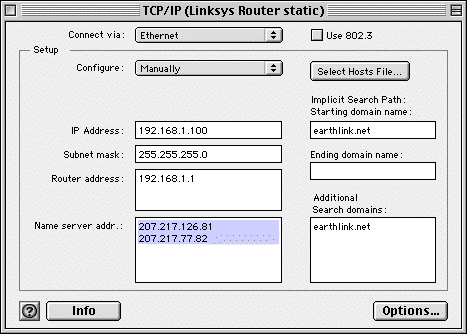
Now reopen the TCP/IP control panel, and change the pop-up menu to read "Configure: Manually"; all of the fields will now be editable, and you can simply transcribe into the appropriate fields all the addresses and domains that you have been writing down. It may or may not be necessary to power-cycle everything at this point; I think I had to do so to get the router talking to the computer again, but you might not. In any case, you should now find that your computer, router, and DSL modem are working together just as they did before--except now you aren't discriminating against your oldest Macs any more! Macs that have the TCP/IP control panel instead of the older MacTCP control panel can be set up just like the first one you configured. You don't have to do all the router configuration using the browser; just set up their TCP/IP control panels like this one, but with different IP addresses (I'd suggest letting the next one use 192.168.1.101, then 192.168.1.102, etc., to avoid confusion!). Any of these Macs (or PCs, or Linux machines, with their different methods of entering the TCP/IP information) that you connect to your LAN can now actuate the router and DSL modem on their own, without relying on a newer computer to do the job for them.
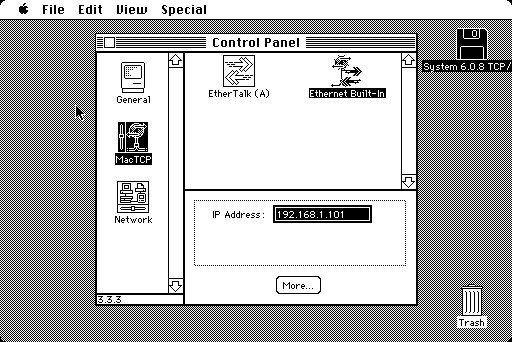
Now let's get the oldsters on board. I have an SE with an Asante Ethernet card, which boots System 6.0.8 off an 800 kB floppy with additional network software as I have described elsewhere. From the Apple Menu, activate the Control Panel (singular!), and click on the icon for MacTCP at the left; make sure that the Ethernet Built-In (or, for some machines, simply Ethernet) icon in the right half of the Control Panel is highlighted. (According to TIL article 7513, EtherTalk encapsulates TCP/IP in AppleTalk packets, which will be indigestible to your DSL modem. The Network icon at the bottom of the left side lets you choose whether to use Ethertalk to communicate with other Macs via AppleTalk over the Ethernet connection, or to use a serial connection for AppleTalk instead, and this has nothing to do with TCP/IP.) The "IP Address" field at the bottom may or may not be editable yet; just ignore it for the moment, and click on the "More..." button.
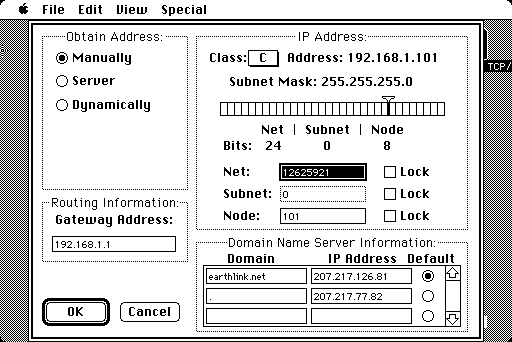
Here is where you enter the information that, on newer Macs, goes in the TCP/IP control panel. It looks like you have the same kind of "Obtain Address:" choices as on the more modern control panel, but according to TIL Article 19915, "Obtain Address: Dynamically" is not DHCP, but rather an obsolete proprietary Apple protocol, and "Obtain Address: Server" is BootP, a predecessor to DHCP. "Obtain Address: Manually" is still the same, though! Click that radio button, then use the pop-up menu at upper right to set a "Class: C Address" (another obsolete distinction, discussed here). It may be necessary to drag the slider above the "Net | Subnet | Node" scale to the position shown (this will change the "Subnet Mask:" numbers to match what you have written down from your other Mac), or it may jump there when you set the address class. In any case, then enter the router's address in the "Gateway Address" field, and the Domain and Domain Name Server (DNS) information at lower right (use a period to "ditto" the domain name on the second line, and specify the first address as the default with the radio button). This will put values into the "Net:" and "Subnet:" boxes (the latter will be zero unless you have reason to mess with the slider above to give it more than 0 bits!). Finally, type the last three digits of this Mac's IP address into the "Node:" box, and click the "OK" button; you will find yourself with a control panel showing the complete IP address, as in the previous screenshot, and you are done configuring!
For suggestions on which applications to use once you're on the 'Net, plus disk images with the above system software, see the inimitable Jag's House; I have Telnet 2.6 and Eudora 1.3.1 on another 800 kB floppy. I have not found a web browser that's small enough to fit on an 800 kB floppy, but hey, I can boot System 7.5.5 from my SCSI Zip disk if I want to surf the graphical WWW in glorious 1-bit color! With floppy-based System 6.0.8 I can use my EarthLink and iTools email accounts with Eudora, and I have saved electricity during our current power crunch by using 50 watts or so for my SE, not a few hundred for my FrankenCurve and its 17" monitor, to Telnet to a workstation at my lab when I just needed a command-line interface (which is most of the time!). In any case, as somebody who is in the midst of installing Mac OS X on my PowerBook G3 Series (Wallstreet) at the same time as my SE is chugging along with System 6.0.8 off an 800 kB floppy, I really find it impressive that this ancient (1987-1989 vintage) machine can still handle the very newest Internet broadband connection, "with a little help from its friends."
 Back
to Mac Museum
Back
to Mac Museum![]()
new 24 March 2001 (X-day!)
![]()